Java · 框架 · Spring Boot

Sping Boot 入门

简介

简化 Spring 应用开发的框架,对整个 Spring 技术栈的一个大整合,J2EE 一站式解决方案,思想约定大于配置。

创建

Spring Initializr

打包

1
2
3
4
5
6
7
8
9
<!-- 该插件可以将应用打包成一个可执行的jar包 -->
<build>
<plugins>
<plugin>
<groupId>org.springframework.boot</groupId>
<artifactId>spring-boot-maven-plugin</artifactId>
</plugin>
</plugins>
</build>
1
[INFO] Building jar: /Users/raohui/Code/springboot-demo/target/springboot-demo-0.0.1-SNAPSHOT.jar

部署

1
2
3
4
5
6
7
8
9
10
11
12
13
14
15
16
17
18
19
20
21
22
23
$ java -jar springboot-demo-0.0.1-SNAPSHOT.jar 

. ____ _ __ _ _
/\\ / ___'_ __ _ _(_)_ __ __ _ \ \ \ \
( ( )\___ | '_ | '_| | '_ \/ _` | \ \ \ \
\\/ ___)| |_)| | | | | || (_| | ) ) ) )
' |____| .__|_| |_|_| |_\__, | / / / /
=========|_|==============|___/=/_/_/_/
:: Spring Boot :: (v2.2.1.RELEASE)

2019-11-28 16:19:15.628 INFO 79863 --- [ main] com.rao.springboot.demo.RunApplication : Starting RunApplication v0.0.1-SNAPSHOT on raohuideMacBook-Pro.local with PID 79863 (/Users/raohui/Code/springboot-demo/target/springboot-demo-0.0.1-SNAPSHOT.jar started by raohui in /Users/raohui/Code/springboot-demo/target)
2019-11-28 16:19:15.630 INFO 79863 --- [ main] com.rao.springboot.demo.RunApplication : No active profile set, falling back to default profiles: default
2019-11-28 16:19:16.292 INFO 79863 --- [ main] o.s.b.w.embedded.tomcat.TomcatWebServer : Tomcat initialized with port(s): 8080 (http)
2019-11-28 16:19:16.299 INFO 79863 --- [ main] o.apache.catalina.core.StandardService : Starting service [Tomcat]
2019-11-28 16:19:16.300 INFO 79863 --- [ main] org.apache.catalina.core.StandardEngine : Starting Servlet engine: [Apache Tomcat/9.0.27]
2019-11-28 16:19:16.343 INFO 79863 --- [ main] o.a.c.c.C.[Tomcat].[localhost].[/] : Initializing Spring embedded WebApplicationContext
2019-11-28 16:19:16.343 INFO 79863 --- [ main] o.s.web.context.ContextLoader : Root WebApplicationContext: initialization completed in 682 ms
2019-11-28 16:19:16.466 INFO 79863 --- [ main] o.s.s.concurrent.ThreadPoolTaskExecutor : Initializing ExecutorService 'applicationTaskExecutor'
2019-11-28 16:19:16.579 INFO 79863 --- [ main] o.s.b.w.embedded.tomcat.TomcatWebServer : Tomcat started on port(s): 8080 (http) with context path ''
2019-11-28 16:19:16.582 INFO 79863 --- [ main] com.rao.springboot.demo.RunApplication : Started RunApplication in 6.228 seconds (JVM running for 6.543)
2019-11-28 16:19:34.770 INFO 79863 --- [nio-8080-exec-1] o.a.c.c.C.[Tomcat].[localhost].[/] : Initializing Spring DispatcherServlet 'dispatcherServlet'
2019-11-28 16:19:34.770 INFO 79863 --- [nio-8080-exec-1] o.s.web.servlet.DispatcherServlet : Initializing Servlet 'dispatcherServlet'
2019-11-28 16:19:34.774 INFO 79863 --- [nio-8080-exec-1] o.s.web.servlet.DispatcherServlet : Completed initialization in 4 ms
  • pom 父项目:真正管理 Spring Boot 应用里面的所有依赖版本
1
2
3
4
5
6
<parent>
<groupId>org.springframework.boot</groupId>
<artifactId>spring-boot-starter-parent</artifactId>
<version>2.2.1.RELEASE</version>
<relativePath/>
</parent>
1
2
3
4
5
6
7
8
9
10
11
12
<!-- web模块正常运行所依赖的组件 -->
<dependency>
<groupId>org.springframework.boot</groupId>
<artifactId>spring-boot-starter-web</artifactId>
</dependency>

<!-- Spring Boot进行单元测试的模块 -->
<dependency>
<groupId>org.springframework.boot</groupId>
<artifactId>spring-boot-starter-test</artifactId>
<scope>test</scope>
</dependency>
1
2
3
4
5
6
7
@SpringBootApplication
public class RunApplication {

public static void main(String[] args) {
SpringApplication.run(RunApplication.class, args);
}
}
  • @SpringBootApplication:这个注解说明该类是 Spring Boot 应用的主配置类,Spring Boot 就应该运行这个类的 main 方法来启动应用。
1
2
3
4
5
6
7
8
9
10
11
12
13
14
15
@Target(ElementType.TYPE)
@Retention(RetentionPolicy.RUNTIME)
@Documented
@Inherited
@SpringBootConfiguration
@EnableAutoConfiguration
@ComponentScan(excludeFilters = { @Filter(type = FilterType.CUSTOM, classes = TypeExcludeFilter.class),
@Filter(type = FilterType.CUSTOM, classes = AutoConfigurationExcludeFilter.class) })
public @interface SpringBootApplication {

@Target(ElementType.TYPE)
@Retention(RetentionPolicy.RUNTIME)
@Documented
@Configuration
public @interface SpringBootConfiguration
  • @SpringBootConfiguration:Spring Boot 的配置类,@Configuration 配置类上来标注这个注解。

  • @EnableAutoConfiguration:注解 Spring Boot 开启自动配置功能,有了自动配置类,就免去了我们手动编写配置注入功能组件等工作。

小结

Spring Boot 在启动的时候从类路径下的 META-INF/spring-factories 获取 EnableAutoConfiguration 指定的值,将这些值作为自动配置类导入到容器中,自动配置类就生效,帮我们进行自动配置工作,spring-boot-autoconfigure-2.2.1.RELEASE.jar

1
2
3
4
5
6
7
8
9
10
11
12
13
14
15
16
17
18
19
20
21
@RestController
@RequestMapping("api")
public class DeptController {
@Autowired
private DeptService deptService;

@Autowired
private DataScope dataScope;

private static final String ENTITY_NAME = "dept";

@Log("查询部门")
@GetMapping(value = "/dept")
@PreAuthorize("hasAnyRole('ADMIN','USER_ALL','USER_SELECT','DEPT_ALL','DEPT_SELECT')")
public ResponseEntity getDepts(DeptQueryCriteria criteria){
// 数据权限
criteria.setIds(dataScope.getDeptIds());
List<DeptDTO> deptDTOS = deptService.queryAll(criteria);
return new ResponseEntity(deptService.buildTree(deptDTOS),HttpStatus.OK);
}
}

@RestController:这个类所有方法返回的数据直接写给浏览器,如果是对象转为 json 数据。

Spring Boot 配置

全局配置文件

可以对一些默认配置值进行修改,配置文件存放在 /src/main/resources 目录或者类路径 /config 下。

  • application.properties
  • application.yml

Yaml:以数据为中心,比 json、xml 更适合做配置文件

1
2
server:
port: 8081
1
2
3
4
5
6
7
8
9
10
11
12
13
14
15
16
17
18
19
20
21
22
23
24
25
26
27
28
29
package com.rao.springboot.demo.domain;

import lombok.Data;
import org.springframework.boot.context.properties.ConfigurationProperties;
import org.springframework.stereotype.Component;

import java.util.Date;
import java.util.List;
import java.util.Map;

/**
* @author Rao Hui
* @date 2019-11-29 11:12
*/
@Data
@Component
@ConfigurationProperties(prefix = "person")
public class Person {

private String name;
private Integer age;
private Boolean boss;
private Date birth;

private Map<String,Object> maps;
private List<String> lists;

private Dog dog;
}

@DataLombok 提供,加了 @Data 注解的类,编译后会自动给我们加上下列方法:

  • 所有属性的 get() 和 set()
  • toString()
  • hashCode()
1
2
3
4
5
<dependency>
<groupId>org.projectlombok</groupId>
<artifactId>lombok</artifactId>
<version>1.18.10</version>
</dependency>

@Component:把普通 POJO 实例化到 Spring 容器中,相当于配置文件中的 <bean id="" class=""/>

@ConfigurationProperties(prefix = “person”):默认从全局配置文件获取值,此注解将类属性和配置文件中相关配置进行绑定,一一映射。

1
2
3
4
5
6
7
8
9
10
11
12
13
14
15
16
package com.rao.springboot.demo.domain;

/**
* @author Rao Hui
* @date 2019-11-29 11:12
*/

import lombok.Data;

@Data
public class Dog {

private String name;
private Integer age;
private String colour;
}

application.yml

1
2
3
4
5
6
7
8
9
10
11
12
13
person:
name: rao
age: 29
boss: false
birth: 2019/01/01
maps: {height: 173cm,weight: 62kg}
lists:
- lisi
- zhangsan
dog:
name: 小狗
age: 12
colour: blue

@Value 与 @ConfigurationProperties 对比:

  • 只是在某个业务逻辑中需要获取一下配置文件中的某项值,使用 @Value
  • 专门编写 JavaBean 来和配置文件映射,使用 @ConfigurationProperties
@ConfigurationProperties @Value
功能 批量注入配置文件中的属性 一个个指定
松散绑定 支持 不支持
SePL 不支持 支持
JSR303 数据校验 支持 不支持
复杂类型封装 支持 不支持

测试类

1
2
3
4
5
6
7
8
9
10
11
12
13
14
15
16
17
18
package com.rao.springboot.demo;

import com.rao.springboot.demo.domain.Person;
import org.junit.jupiter.api.Test;
import org.springframework.beans.factory.annotation.Autowired;
import org.springframework.boot.test.context.SpringBootTest;

@SpringBootTest
class RunApplicationTests {

@Autowired
Person person;

@Test
void contextLoads() {
System.out.println(person.toString());
}
}
1
Person(name=rao, age=29, boss=false, birth=Tue Jan 01 00:00:00 CST 2019, maps={height=173cm, weight=62kg}, lists=[lisi, zhangsan], dog=Dog(name=小狗, age=12, colour=blue))

@Autowired

@PropertySource(value = “classpath:person.properties”):可以加载指定位置的配置文件。

@ImportResource:导入 Spring 的配置文件,让配置文件里面的内容生效。

Spring Boot 推荐给容器中添加组件的方式:使用 @Configuration @Bean 的配置类替代配置文件给容器添加组件,容器中默认组件名就是方法名。

配置文件占位符:${}

Profile

目的:Spring 针对不同环境提供不同配置功能的支持,可以通过激活、指定参数等方式快速切换环境。

  • 多 profile 文件形式:application-{profile}.properties/yml

  • yml 支持多文档块方式:—

  • 激活指定 profile:配置文件 spring.profiles.active=dev,或者命令行 –spring.profiles.active=dev,或者虚拟机参数指定。

1
2
3
4
5
6
7
8
9
10
11
12
13
14
15
16
17
18
19
20
21
22
23
24
25
26
27
28
29
30
31
32
33
34
35
36
37
38
39
40
41
42
43
44
45
46
47
48
person:
name: rao
age: 29
boss: false
birth: 2019/01/01
maps: {height: 173cm,weight: 62kg}
lists:
- lisi
- zhangsan
dog:
name: 小狗
age: 12
colour: blue
spring:
profiles:
active: prod
---
spring:
profiles: dev
person:
name: hui
age: 29
boss: false
birth: 2019/01/01
maps: {height: 173cm,weight: 62kg}
lists:
- lisi
- zhangsan
dog:
name: 小狗
age: 12
colour: blue
---
spring:
profiles: prod
person:
name: yu
age: 29
boss: false
birth: 2019/01/01
maps: {height: 173cm,weight: 62kg}
lists:
- lisi
- zhangsan
dog:
name: 小狗
age: 12
colour: blue

配置文件加载位置:优先级由高到低,优先级高会覆盖优先级低的配置,全部加载互补配置。

  • -file:./config/
  • -file:./
  • -classpath:/config/
  • -classpath:/

Spring Boot 日志

Spring Boot:slf4j + log4j/log4j2/logback
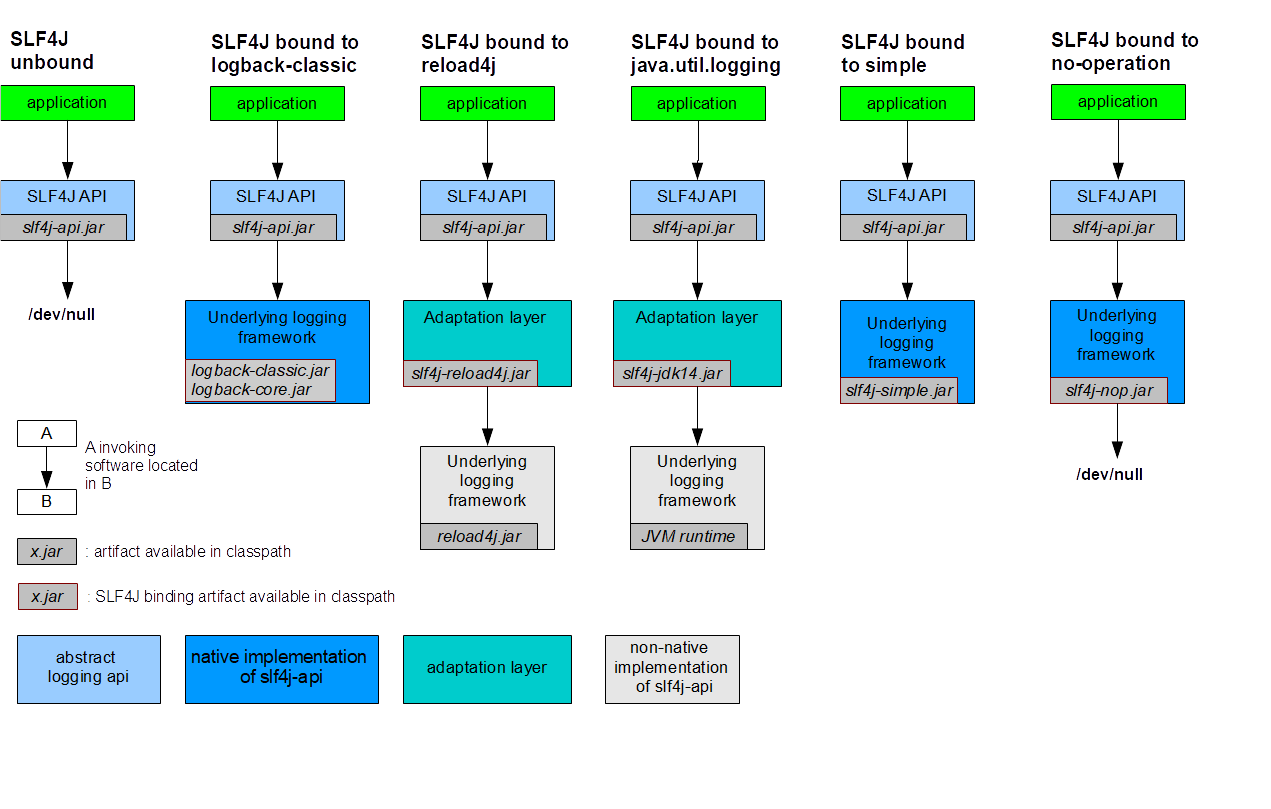
每一个日志的实现都有自己的配置文件,使用 slf4j 之后,配置文件还是做成日志实现框架自己本身的配置文件。

Spring Boot 能自动适配所有的日志,而且底层使用 slf4j + logback 的方式记录日志,引入其他框架的时候,只需要把这个框架依赖的日志框架排除掉。

Spring Boot 与 Web 开发

模板引擎 thymeleaf